
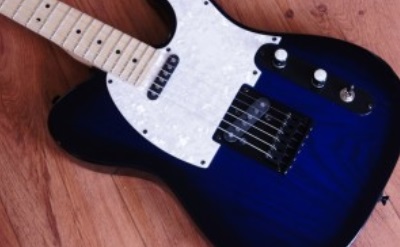
BLUE SILVERMETAL SUNBURST GUITAR FINISH
Necessary materials
Colorless primer anti-bubble 1: 1 with hardener 190021
Polyurethane sealer 140109 White Guitars 2: 1 with hardener 190021
Nitorlak Guitar Silversparkle Spray BR
Dye Blue
Nitorlak Guitar “Vintage” BR
Nitorlak Solvent Medium
Nitorlak Solvent Retard
Sandpapper: Grains 240 – 400 – 800 – 2000

Steps for painting Electric Guitar Blue SilverMetal Sunburst
1. Sanding the guitar body with 240 and 400 grit sanding always in favor of the wood grain to avoid creating stripes across. 2. Application of bubbler Chapa 110060 Colorless primer 1: 1 with hardener 190021 in the body of the guitar. In this way we eliminate the differences in absorption has wood varnish in different areas. We close the pores of the wood and avoid the appearance of bubbles on the guitar. 3. Allow to dry the body of the guitar at least 24 hrs. 4. Sanding the guitar body with 400 grit sandpaper 5. Application of the first coat of polyurethane sealer 140 109 White Guitars 2: 1 with hardener 190021. The white sealant helps to smooth the surface of the wood. It is the most important part of the whole process. 6. Allow to dry guitar 6-8 hrs 7. Sanding with 400 grit sandpape 8. Apply a second coat of sealer white 140 109 in the body of the guitar 9. Allow to dry guitar 12 hours 10. Grit sanding with 400 and 800 11. Application of 250004 Spray Nitorlak Guitars SilverSparkle BR. Although no picture, a thin layer of metallic effect on white background is applied. This metallic blue tint to highlight sparkles sparkles. 12. Application of Fast Concentrate Stain 480 060 Blue with 540421 Valdis Universal Thinner Medium Evaporation + 10% nitrofinish the whole body of the guitar. If you do not put some nitro finishing, dyeing slide on the body of the guitar. Thus it is fixedand uniform 13. Application of Sunburst effect with the same previous blue tint, blurring the side 14. Let dry 12 hours and apply colorless gloss nitro finish 15. Let dry for 24 hours and reapply another coat of gloss nitro finish. No we sanded now because surely pelaremos blue tint, sogive another layer of finish that will give us security when sanding later. 16. Let dry for 24 hours and sandpaper with 400 and 800 to remove all the glitter and leave a smooth surface, but unpeeled dye.Beware of edges and profiles, and it is easy sanding and stripping excess dye. If you this happens, you can reapply the nitro dye on the bare area (always with 10 or 15% nitro finish in the mixture) 17. Go applying topcoats with the following procedure: Always apply thin coats rather to stretch the material and not pick Lowering the finish between 10% and 15% with medium and slow solvent (half and half) to not think orange peel (especially with high temperatures) Very importantly, the finished repainting must do so with at least one day between coats so that when we apply the following hands, do not remove the layer below. Sanding the last layers with grit 2000 Note: We can put a drop d blue tint to the finish to be giving depth to the different layers of varnish guitar 18. To polish expect 8-10 days. Before polishing, sanding with sandpaper 2000 on the finished adding water and wet sandingalways without excessive pressure. Use a high-speed polishing and never exert excessive pressure on the finish. If wesobrecalentamos material shall be white. Regarding polishing paste using a medium grit to remove larger particles and then afine grained to make the brightness of the polished. It is also advisable to use a rinse additive for final review.Materiales necesarios
Imprimación Incolora Chapa Antiburbujas 1:1 con endurecedorSellador de poliuretano Blanco Guitarras 2:1 con endurecedor 190021
Nitorlak Guitarras Silversparkle Spray BR
Tinte Concentrado Rápido Azul
Nitorlak Guitarras “Vintage” BR
Valdis Disolvente Universal Evaporación Media
Disolvente Antivelo Evaporación Lenta
Lijas:Grano 240 – 400 – 800 – 2000